Throughout the year, I stumble upon yummy looking recipes that I bookmark for the future, and I get particularly excited when I find a delectable candy recipe. It’s a bit strange, since I don’t have a huge sweet tooth, but I take a lot of pride in setting out a great holiday treat platter at Christmas.
This year, I’m doing a bit of a theme since all my holiday treats contain peanut butter and/or peanuts.
Thankfully, I don’t have any family or friends with peanut allergies, but if you do or are unsure, always label your treats if they contain peanuts. My Mom and I normally decide together what we’re going to make, even though I end up making many of the treats since she’s working.
But I don’t mind. Nor does my Dad who helps out by licking the bowls clean for me! He’s a great sous chef. 🙂
3 Steps to Make Holiday Baking a Snap
This is an incredibly hectic time of the year for everyone but with a little planning, you can squeeze in making some delicious treats this holiday season.
Step 1: Create a Baking Schedule
The good news is that many holiday treats can be made in advance.
So clean out your freezer and make a list of all the goodies you plan to offer and at which gathering, then create your baking schedule.
Cookies, breads and fudge freeze very well and their shelf life will vary from a few days to a week after they are thawed.
Be sure to seal them carefully in airtight containers so they don’t get freezer burn.
Caramels and candy bark generally have longer shelf lives too, so you can make them a few days in advance of your holiday parties.
Christmas Bonus Tip: Got kids? Then put them to work! Some of my favorite memories are helping my Mom bake our holidays treats.
This is a great way for you to create new traditions and memories with your kids. With the added bonus of teaching them how to cook so when they leave home, they don’t have to live on takeout or fast food.
Step 2: Package Your Holiday Treats Well
There is nothing worse than receiving some delicious homemade goodies only to unwrap them and find crumbles instead of cookies. If you’re planning on shipping treats, you can use pretty tins but ideally the treats should be sealed in a separate airtight wrap prior to being placed in the container.
Leave as little room as possible so the treats don’t shift and break.
Next pack the container into a sturdy box filled with crumpled newspapers, bubble wrap or styrofoam popcorn so the containers cannot move.
Dollar stores and the One Spot at Target (their mini-dollar section within their store) have great holiday containers.
Christmas Bonus Tip: If you still have some space in your containers, consider adding wrapped candy, such as Hershey’s kisses or individually wrapped candy canes, to fill the space.
Step 3: Make Only One Treat to Gift and Share
I love setting out a full platter with various treats, but it can be expensive, and sometimes our budgets won’t stretch far enough for us to make five or six different holiday candies.
So I say don’t. Search through your recipes and pick one that is well-loved and affordable and make it your signature holiday treat this year.
Now you can buy some of the ingredients in bulk to help further lower the cost and look for sales as well. I’ve seen incredible prices on butter, flour and sugar at the grocery stores right now.
Christmas Bonus Tip: If you really want to put together a tray with multiple goodies than consider hosting a cookie exchange with friends and co-workers.
Everyone brings a large quantity of one special holiday treat and everyone shares to create big holiday platters. It’s a great way to have a variety of treats while only having to make one treat yourself.

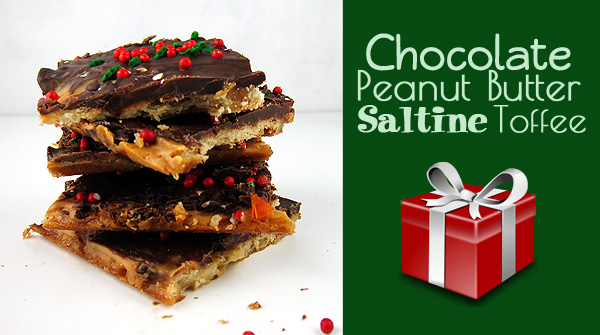
Chocolate Peanut Butter Saltine Toffee
Often referred to as candy crack, this is an incredibly addictive treat. I may not have a huge sweet tooth, but I could NOT stop nibbling on this. It will become a favorite holiday treat for you and make a welcome gift. Enjoy!
INGREDIENTS
- One sleeve salted Saltine crackers (I used about 48 crackers so a bit more than one sleeve)
- 1 cup brown sugar
- 1 cup unsalted butter
- 2 1/2 cups semi-sweet chocolate chips
- 6 Tablespoons creamy peanut butter, melted
- sprinkles or crushed M&Ms (optional)
DIRECTIONS
- Preheat oven to 400F degrees. Generously spray a cookie sheet with non-stick cooking spray. Line saltines in the pan, leaving a little bit of room between each. I didn’t leave a ton of space between them but they didn’t overlap one another either. Set aside.
- In a large, heavy bottomed sauce pan, bring butter and brown to sugar to a boil over medium heat. Once it begins boiling, set your timer for 3 minutes and walk away. Do not stir, just let it boil. Once the buzzer goes off, pour the boiling caramel over the crackers as evenly as possible. If needed, take a knife and spread the caramel so all the crackers are covered. Bake for 5 minutes.
- Meanwhile, melt the peanut butter in a small microwaveable bowl. Remove toffee from oven and spread the peanut butter into one even layer over the toffee. Cover with chocolate chips and bake for 1-2 minutes or until chocolate is melted and spreadable. Using a knife or spatula, smooth chocolate over peanut butter layer. Immediately top with crushed M&Ms and sprinkles, if using.
- Let cool for 15 minutes then refrigerate for 2 hours. Once the toffee is set, break into pieces. It was hard to cut into perfect squares. It’s better to just break it apart and let the pieces vary in size. This is what we call rustic and intentional, rather than the stupid toffee won’t cut nicely without breaking. 🙂
- Store toffee in an airtight container in the refrigerator or at room temperature for up to 10 days. I prefer in the refrigerator as it keeps it extra crispy.
Enjoy!